Wednesday, August 3, 2011

Real Couple: Vintage Romance

I am so excited to be sharing this couple's engagement session with you for this weeks Wedding Wednesday feature.  Why is that you ask?  Well, the couple of these gorgeous photos happen to be the first clients for Cammi Lee Events!  Meet Molly and TJ!

I met Molly, the bride-to-be, soon after I graduated college when I started my first job for large festival-product event company.  Molly was the graphic designer {who does phenomenal work - she is designing all of my branding and web site... which should be released by the end of September!} and I worked as a Marketing Coordinator, so we worked quite closely with one another.  This girl is simply amazing - definitely one of the nicest girls I've ever met... and the drive and motivation she has to fulfill her dreams is certainly motivating!

Molly and TJ have such an adorable relationship - you can definitely tell they're so much in love with one another.  While TJ made it known in the beginning that he wasn't super excited to be out taking engagement photos {I really can't imagine there are many guys who are ecstatic about this part of the wedding planning} he loosened up and their photographer, Andrew Saxum of A.T.S. Photography, did an awesome job capturing their personalities in their engagement photos.

As their wedding coordinator, I went out with Molly, TJ and TJ's younger sister for their e-session.  The day was a little steamy and overcast, so we headed into downtown Minneapolis to get some city shots {I LOVE city photos!}.  After a couple of hours {and a bunch of photos later}, we headed to a gorgeous garden in the Uptown area.  Not 10 minutes into the photos at that location, it started down pouring... while it put a bit of a damper on our engagement photo parade, the rainy photos turned out so cute with the cute couple under their umbrella!


one of my absolute favorites!


another favorite!


priceless!

Molly's vision for her wedding is Vintage Romance - think light pinks, creams, peaches, etc.  These photos could not have matched her vision more perfectly, if I do say so myself!  Her choice for attire is perfect for a vintage wedding, and we've got a few ideas up our sleeves to incorporate these AMAZING engagement photos into their big day... you'll have to stay tuned for that! :)

If you're interested in checking out more of Andrew's great work, head over to his Flickr or Facebook pages!

Tuesday, August 2, 2011

DIY: Diaper Motorcycle

Back in May I attended (and helped host) a baby shower for my boyfriends brother's girlfriend, Shawna.  The shower was on the smaller side with about 10 guests, most of which were older women {grandma's, aunts, grandma-to-be's friends... plus a few cousins who are having kids of their own. And me.}.  Because the shower was being hosted at my boyfriend's cousin's house, with most of the guests from out of town, we didn't do much decorating {gasp, I know!}.  With that in mind, I wanted to make something super cute as a centerpiece and focal point for the party - so I found some directions here for a Diaper Motorcycle.  I chose to make this as part of my gift for Shawna for two reasons - 1. The daddy-to-be is head over heels {literally} in love with BMX biking {and he's really good at it!} and 2. They were going with a monkey theme for their nursery {perfect for a BMX biker's kid, right?}.


This was actually quite easy to make... you just have to have patience!  I will give a quick overview of what I used to make my diaper bike, but please head over to the web site I used for more detailed instructions and photos.

Materials:

- 2 cloth bibs {you don't want plastic or they won't form to the wheels like a hubcap}
- 3 receiving blankets {I used 2 blankets to connect the wheels and a burp rag for
  the handle bars}
- 1 4-oz bottle
- 1 wash cloth
- 1 stuffed animal
- 1" ribbon {used to wrap wheels when complete}
- Linking rings {you can find these in the toy aisle of Target, Walmart or at Toys R Us
  I'm sure}
- Diapers {this is where it gets tricky.  The site told me to use 70, but they used size
  2 diapers.  I ended up using 36 because I was using size 1-2... it just scaled down
  the size a bit, which worked with my stuffed animal, anyway}
- Additional toys/clothes that you want to add to it {the site said to use socks as
  part of the handle bars, I actually bought some wrist rattles and used those
  instead}
- Rubber bands

I was going to bring your through step-by-step instructions, but because I don't have a visual to show you for each step, and because I think the web site does a great job detailing what to do, I suggest you take a look there. 

Have you made a diaper motorcycle before?  How about other types of diaper cakes or items as a gift or decor for a baby shower?  We would love for you to share them with us!

Friday, July 29, 2011

Featured Vendor: Seamless Paperie

We haven't done a Featured Vendor post in quite some time, and I really loved the series so I wanted to bring it back. So, let's roll!

This weeks featured vendor is Courtney from Seamless Paperie.  Courtney's work is just amazing - she has such a unique style for the invitation and stationery industry, with designs that include everything from contemporary to elegant.

Courtney of Seamless Paperie is definitely a busy-body when it comes to her businesses - Seamless Paperie and Seamless Creative.  Always the artsy type, with an added interested in typography, Courtney began designing stationery and invitations for herself and friends, which then bloomed into a business when she started receiving design requests from strangers.  Courtney first started her branding and design company, Seamless Creative, and followed it up with her stationery and invitation design company, Seamless Paperie.   Read on to learn more about Courtney and her work.


~ * ~

How did you come up with your business name?
My branding and design company, Seamless Creative, already existed. So in order to keep the companies consistent, it was a simple decision to go with Seamless Paperie. In terms of the original "Seamless" name, it all grew out of  the idea that design is literally a part of everything I do and how I see the world.

What inspires you and your work?
Everything around me, from old signage to nature to popular culture.

What do you love most about your job?
Even though the general process is the same, every project has an entirely different outcome, so it's never boring.

What is one thing you wish every client knew/did that would make your job easier in assisting them?
That the design process is just that—a process. To get the best result it requires collaboration, patience and clear communication.

 What is your ultimate goal/dream for your business or professional life?
To have my hand in lots of different things—blogging, more long-term branding and stationery projects, paper products for sale—and to be in a position to initiate personal art and design projects as well.

If you weren't a graphic designer/stationery and invitation designer, what would your dream job be?
Design is so intrinsic to who I am that I can't imagine doing anything that didn't have ties to art or design. I've always said that I'd love to be an interior designer in another life. At the moment, my current jobs and responsibilities prevent me from devoting as much time to that as I'd like to in my own home. But hopefully that will change in the near future!

What advice and/or tips would you give to people looking to start their own business adventure?  What did you find helpful when starting out?  What were the most difficult obstacles to overcome?
For me, it really grew out of a passion for what I do. You have to put so much energy into starting and running a business, that it's an absolute necessity to have a love for the work. Otherwise, you'll burn out before you even get off the ground.
My biggest challenge by far, is balance. Fitting in all of the duties involved in running a business with my personal life is definitely something I struggle with on a daily basis. I'm constantly trying to figure out what I can do to make any necessary tasks less time-consuming, so that I have more time for family, friends and relaxation. It's a work in progress, for sure.

Just for fun:

What are five things you simply can't live without?
1. My husband, friends and family. (counting that as 1!)
2. The internet (it is essential to everything I do these days).
3. Apple (the company and all of their products).
4. A sketchbook (I use the Behance Dot Grid sketchbook).
5. Naps! (I take naps far more often than I probably should admit)


What is your favorite color scheme at the moment?
This is a tough one! I love color, so I have a new favorite every day.  But I can never resist a palette of turquoise, royal, teal, lime and kelly green.  I always gravitate toward that blue-green color family.

What is your favorite time of the year to design stationery and invites?
This isn't a time of year I've actually designed for already, but I would love to design for less common occasions - events like a family reunion, an anniversary party, or even an unusual holiday for invitations, like the 4th of July.

What trends are you seeing in the invitation/stationery industry lately?
Less formality, which in my opinion, is great.  It's awesome to see so many couples embracing more colorful and modern designs and themes.


~ * ~


As I mentioned above, Courtney has a great eye and style for everyone's taste.  Check out some of her favorite collections that she designed for past clients.  I bet it's hard for you to pick a favorite!


If you are interested in checking out more of Courtney's work - check out her web sites and follow her on Facebook and Twitter:


Thanks, Courtney, for letting us interview you and show off your gorgeous work!


If you would like to a Featured Vendor on the Cammi Lee Events blog, send us an email and we can chat!

Wednesday, July 27, 2011

Bridal Party PARTY {brunch, luncheon, dinner}

Hi all - I'm terribly sorry we have been missing so much the past few months... I know I promised to be better about blogging and I've failed miserably at keeping up with that promise.  This summer has just been super busy and my focus has been elsewhere - which is no good!  I'm going to try really, really, really hard to get back up to blogging as much as I used to!

Anyway, happy Wedding Wednesday to you all!  I know that typically we do a real wedding, engagement session or bridal shower, but this week I wanted to mix it up a bit.  With that said, make sure to continue to check back for our Wedding Wednesday series because we've got some great real weddings coming up on the blog that you won't want to miss!  But for today's post, we want to talk to all you brides out there about one party you can host for your girls who are standing up for you on your big day.

One thing a bride must never forget when planning her big day is her girls and the time they are taking out of their lives to stand up for her on her big day.  Being a bridesmaid is usually a super fun experience, and honorable as your bride-to-be friend only chooses so many people to be by her side.  With that said, it can also be very expensive {with traveling, gifts, hotel stays, attire, jewelry, etc.} and time consuming {if there are multiple showers to attend, the bachelorette party, rehearsal dinners, weekend events, etc.}.

So, what can a bride do to show her appreciation for her bridesmaids - well, how about hosting an event in THEIR honor? What kind of event you ask?  I'm going to call it a bridal party PARTY {it's sometimes referred to a bridesmaid luncheon, but the event could be hosted any time of day}.

A bridal party PARTY is a way to get the bride and her bridesmaids together right before the wedding to thank them for everything they have done thus far in the planning process, and what they will be doing for on your wedding day.  It's also a great way for those 'maids who don't know each other very well, or who are from out-of-town, to get to know each other for the big day.

I know what some of you might be thinking - with the cost of everything else I'm paying for my wedding, how can I afford to host another party for my girls?  Well brides, this is definitely an extra cost you should be factoring into your budget early in the planning process.  However, if you're close to the big day and don't have much of a budget to throw something extravagant, don't fret.  Bridal luncheons don't have to be expensive... but they should show your appreciation to your bridal party.  Below are some of our favorite ideas, for every budget.


- Bridesmaid Brunch: Prepare some easy brunch foods and have your ladies come over for a couple hours to mingle.  Food items could include crepes, fresh fruit, mini cinnamon rolls, mini french toast, an egg bake, mimosas and lemonade.  The brunch can be as laid back or extravagant as you like - making it an excellent choice for brides  with any type of budget.  You can make the food yourself {especially if you're a fabulous cook!} or have the event catered in.

While this spread is for a baby shower brunch, the color scheme and food choices are PERFECT for a bridesmaid brunch!
SOURCE

- Bridesmaid Luncheon or Dinner: Much like the brunch, a luncheon or dinner is a great choice for brides with any size budget.  The luncheon or dinner can be hosted at the brides home {or brides parents or in-laws to be} or at a favorite restaurant. The nice thing about hosting a luncheon or dinner rather than a brunch is the wider selection of food to serve.  Since you will have the event just days before you wedding, you can put together a menu for all of your girls to enjoy - mixing both healthy and not-so-healthy options.  Some of my favorite menu ideas include mini grilled cheese with tomato soup shooters, mini burgers, chicken and veggie kabobs, Caesar salad {or any type of salad} and fresh fruit and veggies.

Spruce up the dining room with a pretty table cloth, pretty china, vases and flowers
SOURCE

- Bridesmaid Spa/Salon gathering:  This type of get-together might be for brides with a larger budget depending on how its held.  One option could be to take the bridesmaid to a local spa/salon and pay for mani/pedis and a little luncheon following.  Another option is to host a spa party at the brides home {or parents' home}.  Provide different items needed for a mani/pedi party at home {lotions and oils, toe separators, polish, top coat, etc} - you can also provide a light lunch and some mimosas for your guests to enjoy.

Create little goody bags for your guests {you could use some ideas above as part of your bridal favors - make custom totes and you're all set}
SOURCE

So - there are some of our favorite ideas for a bridesmaid get together.   What fun things have you done for your bridesmaids {or as a bridesmaid} for a bridal party PARTY?  What gifts did you give or receive as a bridesmaid gift?

Thursday, July 14, 2011

Real Party: A Thing for Bling Bridal Shower

I always love a unique theme for parties, which is why I loved this "A Thing for Bling" bridal shower that I spotted over on Catch My Party designed by Natasha at Fete Fanatic.  This theme would be perfect for any bride-to-be who loves anything and everything sparkly.  The various props and desserts used for this party were perfect to match with the theme - I just loved the ring pops, pop rocks, fake diamond rings, etc.  The color scheme was great, too - bright fuchsia pink, black and white.


I really love the little details that pulled this party together, Natasha did a fabulous job!  One of my favorite details - the candyabra (the candelabra made of rock candy!)... so fun!  Head over to the Catch My Party party page to check out  more photos from this blingin' bridal shower!

Tuesday, July 12, 2011

I'll have S'more of those Dessert Bars, Please

Growing up, I always LOVED roasting some marshmallows over the fire and enjoy a nice, gooey chocolately, graham crackery S'MORE!  Still, to this day, I love the taste of a nice s'mores treat, which is why I decided to make this delicious Peanut Butter S'mores Bar recipe from Betty Crocker for my family's BBQ this past weekend.


The recipe is SUPER easy and can easily be made as a last minute treat for your family's BBQ or picnic.  There's only a handful ingredients, too.

INGREDIENTS:

- 1 pouch (1 lb 1.5 oz) of Betty Crocker Peanut Butter Cookie mix
   (water, oil and egg as called for on cookie mix directions)
- 1 container Betty Crocker Rich and Creamy chocolate frosting
- 2 cups miniature marshmallows
- 2 cups Golden Grahams cereal

DIRECTIONS:

1. Preheat oven to 350 degrees.  Make cookie mix as directed on pouch. Once dough forms, press into a 13x9-inch ungreased pan.
2. Bake for 16 to 18 minutes or until edges are golden brown.
3. Scoop frosting into a microwavable bowl.  Microwave from 15 to 20 seconds and stir until smooth.  Reserve 1/4 cup.  Spread remaining frosting over cookie mix.  Sprinkle marshmallows and Golden Grahams over frosting.
4. Bake 3 to 5 minutes or until marshmallows are puffed.  Let cool for 15 minutes.  Drizzle remaining frosting over bars.  Cool for another 30 minutes.


See - super easy, right?  Here are some more fun s'mores recipes we want to test out this summer -

S'mores Cookies from Grin and Bake It


S'mores Brownies from Lovin from the Oven


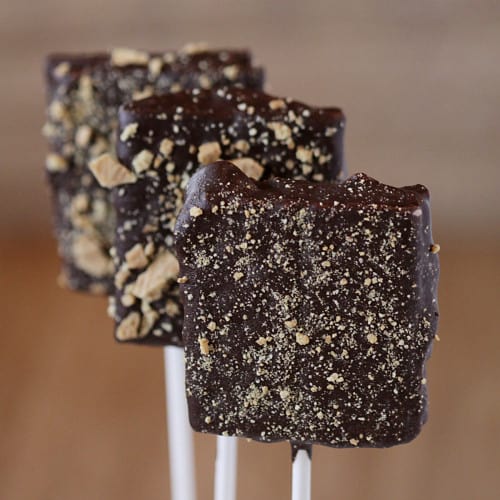
Chocolate Covered S'mores Pops from Love From the Oven


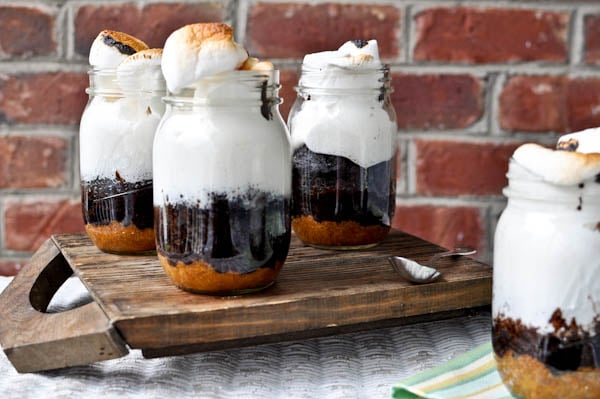
S'mores Cake in a Jar from How Sweet It Is


What S'mores recipes have you tried that are just killer good?  What are your favorites desserts to bring to picnics or barbecues?